这段时间,工作当中杂事比较多,有点像充当产品经理,去给算法业务的同学去安利我们最近完成的一些东西,感觉自己几乎没啥提升,希望这样的日子快点过去,公众号也落下了,主要原因是最近事比较多,又加上还迷上了抖音 什么东北酱,周末一躺就过去了。加上最近网上暴力被裁事情、明星猝死,突然发现中年危机可能就要在眼前,作为最老一批90年后,也马上要30了,但是觉得荒废下去好像也是蛮爽的。哎,迷茫而惆怅的中年危机恐怕是真的要到来了。回到正题,好久没有写过技术文章,最近又开始在读XDL的代码,这次我重点关注在底层,真的觉得质量很高,无愧是阿里妈妈吗的工作,但是无奈基础太差,又加上XDL除了代码开头的license生命几乎没有一行注释, 这里如果有XDL的小伙伴看到,希望把注释补一补,东西是不错,但是也要考虑下我们的水平吧。
本章文章是看到XDL代码之后,发现它自己写了自己的内存管理,这块我之前完全不懂,google一波才明白一些,而TensorFlow本身其实也有一些memory allocation的工作,本章会详细说明下BFC这块的工作。
TensorFlow Memory Manage
BFC是Best fit with coalescing的缩写,下面截图是TensorFlow源码config.proto,其中有关于内存、显存管理的注释文档,BFC是dlmalloc的一个简化版本,DLmalloc是啥,大家不明白没关系,直接理解为内存分配上一个特别硬核的工作,当前很多内存分配的算法很多受其影响。【memory allocate是操作系统下特别复杂的一项工作,如要系统了解,建议读读下OS经典教材memoey manage的几章】。
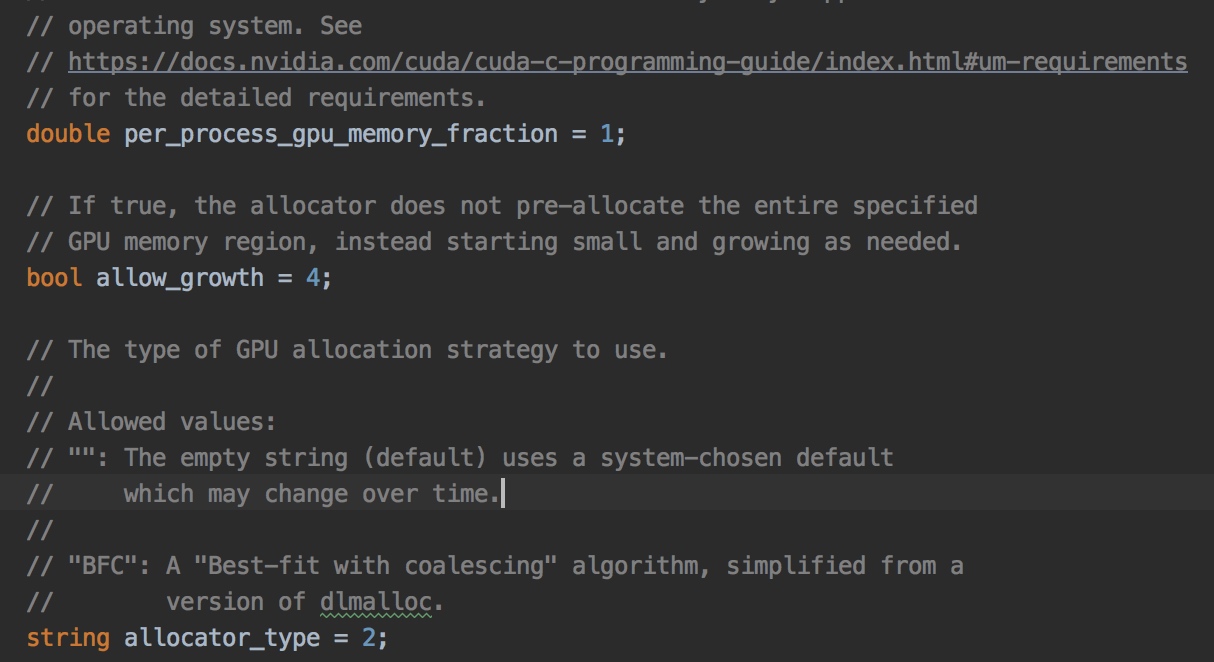
TensorFlow Memory Allocator
BFCAllocator
TensorFlow针对不同的设备,比如cpu下的mkl的allocator,cuda下的allocator,其实现都是有很大的差异的。本文不可能一一详述,仅针对bfc_allocator相关的逻辑进行描述,由于作者在这块经验较少,有任何发现疑问以及问题的请在评论区留言,大家来一起讨论
Allocator: Abstract interface for allocating and deallocating device memory
class Allocator {
 public:
  static constexpr size_t kAllocatorAlignment = 64;

  virtual ~Allocator();

  virtual string Name() = 0;

  virtual void* AllocateRaw(size_t alignment, size_t num_bytes) = 0;

  virtual void* AllocateRaw(size_t alignment, size_t num_bytes,
                            const AllocationAttributes& allocation_attr) {
    return AllocateRaw(alignment, num_bytes);
  }

  virtual void DeallocateRaw(void* ptr) = 0;

  virtual size_t RequestedSize(const void* ptr) const {
    CHECK(false) << "allocator doesn't track sizes";
    return size_t(0);
  }

  virtual size_t AllocatedSize(const void* ptr) const {
    return RequestedSize(ptr);
  }

  virtual int64 AllocationId(const void* ptr) const { return 0; }
  virtual size_t AllocatedSizeSlow(const void* ptr) const {
    if (TracksAllocationSizes()) {
      return AllocatedSize(ptr);
    }
    return 0;
  }

  virtual absl::optional<AllocatorStats> GetStats() { return absl::nullopt; }

  virtual void ClearStats() {}

  virtual void SetSafeFrontier(uint64 count) {}
};


struct AllocationAttributes {
  AllocationAttributes() = default;

  AllocationAttributes(bool no_retry_on_failure, bool allocation_will_be_logged,
                       std::function<uint64()>* freed_by_func)
      : no_retry_on_failure(no_retry_on_failure),
        allocation_will_be_logged(allocation_will_be_logged),
        freed_by_func(freed_by_func) {}

  bool no_retry_on_failure = false;
  bool allocation_will_be_logged = false;
  std::function<uint64()>* freed_by_func = nullptr;  // Not owned.

  TF_DISALLOW_COPY_AND_ASSIGN(AllocationAttributes);
};


struct AllocatorStats {
  int64 num_allocs;          // Number of allocations.
  int64 bytes_in_use;        // Number of bytes in use.
  int64 peak_bytes_in_use;   // The peak bytes in use.
  int64 largest_alloc_size;  // The largest single allocation seen.

  absl::optional<int64> bytes_limit;

  int64 bytes_reserved;       // Number of bytes reserved.
  int64 peak_bytes_reserved;  // The peak number of bytes reserved.
  absl::optional<int64> bytes_reservable_limit;

  AllocatorStats()
      : num_allocs(0),
        bytes_in_use(0),
        peak_bytes_in_use(0),
        largest_alloc_size(0),
        bytes_reserved(0),
        peak_bytes_reserved(0) {}

  string DebugString() const;
};
TensorFlow 内存分配与回收的抽象接口,封装Name, AllocateRaw, DellocateRaw, TracksAllocationSize, AllocatesOpaqueHandle, RequestedSize, AllocatedSize, AllocationId, AllocatedSizeSlow, GetStats, ClearStats, SetSafeFrontier。
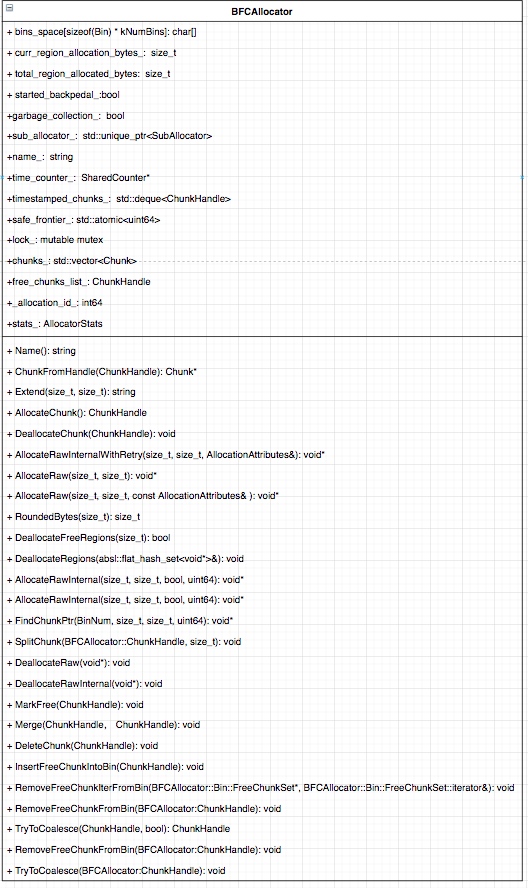
这些逻辑作为父类的纯虚接口,由子类去实现,BFCAllocator的详细接口信息如下:
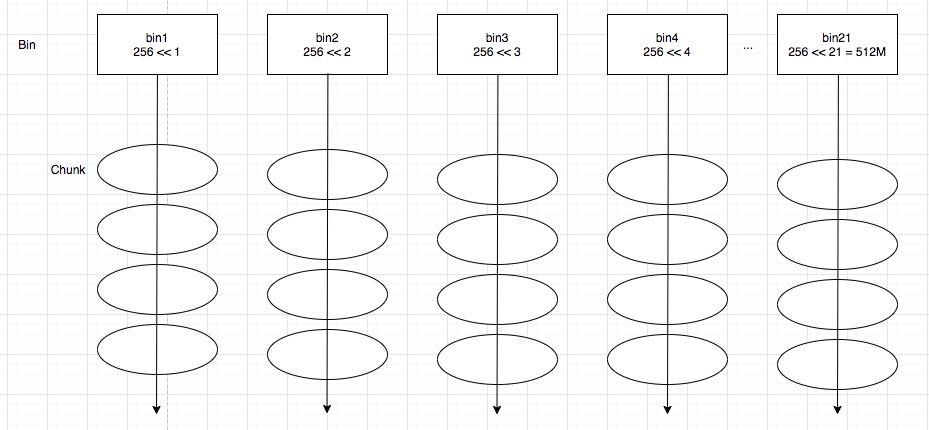
在此之前,BFCAllocator下的两个比较重要的数据结构, Chunk和Bin,两者之间的关系如下图,看起来像一个个糖葫芦,第一个bin size为256<<1, 第二个为256<<2, 一次类推,TF内有21个bin,最后bin size 为256 << 21为512MB,每一个bin下面会接下若干个大于bin size的chunk,整个内存空间由以下的结构来组织,当分配内存大小指定时,系统会遍历bin,找到能够第一次满足chunk > bin_size,每一个bin下的chunk是有序的(Bin下的ChunkComparator)
Chunk
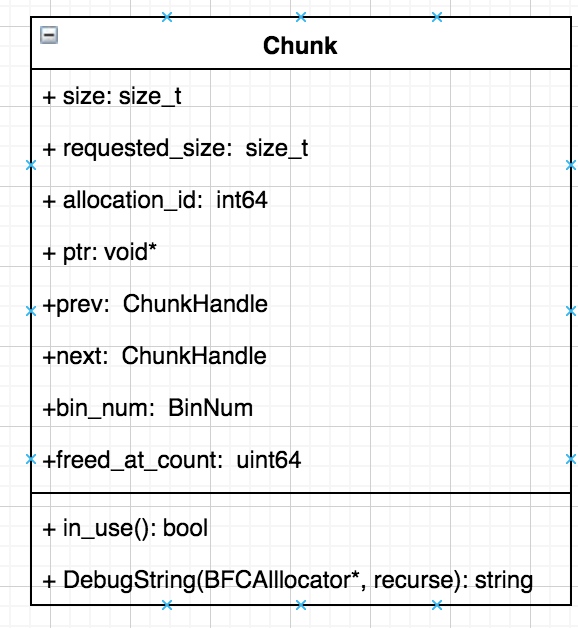
struct Chunk {
    size_t size = 0;
    size_t requested_size = 0;
    int64 allocation_id = -1;
    void* ptr = nullptr;  // pointer to granted subbuffer.
    ChunkHandle prev = kInvalidChunkHandle;
    ChunkHandle next = kInvalidChunkHandle;
    BinNum bin_num = kInvalidBinNum;

    // Optional count when this chunk was most recently made free.
    uint64 freed_at_count = 0;
    bool in_use() const { return allocation_id != -1; }
    string DebugString(BFCAllocator* a,
                       bool recurse) NO_THREAD_SAFETY_ANALYSIS {
      string dbg;
      strings::StrAppend(
          &dbg, "  Size: ", strings::HumanReadableNumBytes(size),
          " | Requested Size: ", strings::HumanReadableNumBytes(requested_size),
          " | in_use: ", in_use(), " | bin_num: ", bin_num);
      if (recurse && prev != BFCAllocator::kInvalidChunkHandle) {
        Chunk* p = a->ChunkFromHandle(prev);
        strings::StrAppend(&dbg, ", prev: ", p->DebugString(a, false));
      }
      if (recurse && next != BFCAllocator::kInvalidChunkHandle) {
        Chunk* n = a->ChunkFromHandle(next);
        strings::StrAppend(&dbg, ", next: ", n->DebugString(a, false));
      }
      return dbg;
    }
  };
Bin
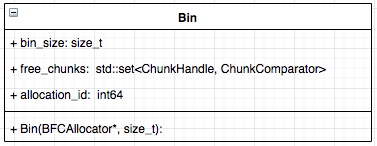
struct Bin {
    // All chunks in this bin have >= bin_size memory.
    size_t bin_size = 0;

    class ChunkComparator {
     public:
      explicit ChunkComparator(BFCAllocator* allocator)
          : allocator_(allocator) {}
      bool operator()(const ChunkHandle ha,
                      const ChunkHandle hb) const NO_THREAD_SAFETY_ANALYSIS {
        const Chunk* a = allocator_->ChunkFromHandle(ha);
        const Chunk* b = allocator_->ChunkFromHandle(hb);
        if (a->size != b->size) {
          return a->size < b->size;
        }
        return a->ptr < b->ptr;
      }

     private:
      BFCAllocator* allocator_;  // The parent allocator
    };

    typedef std::set<ChunkHandle, ChunkComparator> FreeChunkSet;

    FreeChunkSet free_chunks;
    Bin(BFCAllocator* allocator, size_t bs)
        : bin_size(bs), free_chunks(ChunkComparator(allocator)) {}
  };
分配内存
-
rounded_bytes: 保证内存对齐;
-
BinNumForSize(rounded_bytes):找到对应的BinNum;
-
MergeTimestampedChunks: 如果timestamped_chunks_不为空, (required_bytes==0,这里还不是特别理解, 有理解清楚的可以在文章后面评论),则合并;
-
FindChunkPtr:
- 找到第一个满足rounded_bytes的bin;
- 从free_chunks中删除大于rounded_bytes的chunk, 从free_chunks移除;
- 若chunk大小为rounded_bytes的两倍,或者chunk大小比rounded_bytes 大128mb以上, 会将chunk split成满足rounded_bytes和剩余大小的chunk, 然后将后者插入合适bin的free_chunks;
-
如果FindChunkPtr没找到合适的chunk,则尝试Extend
- 如果available_bytes<rounded_bytes,则返回false;
- 如果当前curr_region_allocation_bytes_小于rounded_bytes,则curr_region_allocation_bytes翻倍,直到满足大于rounded_bytes;
- 调用sub_allocator来分配内存块,分配bytes大小为min(rounded_bytes, curr_region_allocation_bytes), 若未能成功分配,则一直尝试分配0.9*bytes, 若最后也未分配成功,则extend失败;
- 分配好内存块之后,创建对应的chunk,这个chunk里保存了,内存块地址等信息,并将chunk插入到对应bin;
-
如果Extend也fail了, 则再次尝试MergeTimestampedChunks来是否满足round_bytes, (这里会聚合最近释放的内存块,直到满足rounded_bytes);
-
若再次MergeTimestampedChunks之后还是无法分配合适的内存块,系统会再次尝试释放已经free的regions,然后尝试extend来满足是否能满足分配rounded_Bytes, 如还是fail,则返回空指针,Allocate 失败;
  void* BFCAllocator::AllocateRawInternal(size_t unused_alignment,
                                          size_t num_bytes,
                                          bool dump_log_on_failure,
                                          uint64 freed_before) {
    if (num_bytes == 0) {
      VLOG(2) << "tried to allocate 0 bytes";
      return nullptr;
    }

    size_t rounded_bytes = RoundedBytes(num_bytes);
    BinNum bin_num = BinNumForSize(rounded_bytes);

    mutex_lock l(lock_);
    if (!timestamped_chunks_.empty()) {
      MergeTimestampedChunks(0);
    }
    void* ptr = FindChunkPtr(bin_num, rounded_bytes, num_bytes, freed_before);
    if (ptr != nullptr) {
      return ptr;
    }

    if (Extend(unused_alignment, rounded_bytes)) {
      ptr = FindChunkPtr(bin_num, rounded_bytes, num_bytes, freed_before);
      if (ptr != nullptr) {
        return ptr;
      }
    }

    if ((freed_before == 0) && (!timestamped_chunks_.empty())) {

      if (MergeTimestampedChunks(rounded_bytes)) {
        ptr = FindChunkPtr(bin_num, rounded_bytes, num_bytes, freed_before);
        if (ptr != nullptr) {
          return ptr;
        }
      }
    }

    if (DeallocateFreeRegions(rounded_bytes) &&
        Extend(unused_alignment, rounded_bytes)) {
      ptr = FindChunkPtr(bin_num, rounded_bytes, num_bytes, freed_before);
      if (ptr != nullptr) {
        return ptr;
      }
    }
释放内存
-
首先,判断ptr是否为空指针,如是,则不作后续操作;
-
region_manager_.get_handle(ptr) 找到对应chunkhandle, 然后将handle标记为free,具体有application_id赋值为-1, 若timing_counter_为true,则记录释放内存时间;
-
调用InsertFreeChunkIntoBin,将已标记为free的chunk插入到合适的Bin中,释放内存完成;
  void BFCAllocator::DeallocateRawInternal(void* ptr) {
    if (ptr == nullptr) {
      VLOG(2) << "tried to deallocate nullptr";
      return;
    }
    mutex_lock l(lock_);

    // Find the chunk from the ptr.
    BFCAllocator::ChunkHandle h = region_manager_.get_handle(ptr);
    CHECK(h != kInvalidChunkHandle);

    MarkFree(h);

    // Consider coalescing it.
    if (timing_counter_) {
      InsertFreeChunkIntoBin(h);
      timestamped_chunks_.push_back(h);
    } else {
      InsertFreeChunkIntoBin(TryToCoalesce(h, false));
    }

    if (VLOG_IS_ON(4)) {
      LOG(INFO) << "F: " << RenderOccupancy();
    }
  }
读源码的方法
我发现看懂了一部分代码之后,再写出来就显得很简单,这个对于读者不是什么好事情,很多小伙伴很有心地去阅读某些框架的底层源码,但是很多时候理解不了,下面我分享给小伙伴几个方法:
- 专项学习某些知识点,比如你看的源码部分是memory manager,你可以去找一些国内外教材、教学视频, 先理解清楚其中概念;
- 至少完整看两遍代码:第一遍,不要嫌麻烦,将每个类的所有的成员函数、成员变量画出来,更给力的是讲类间的关系引用也画出来;第二遍,再逐个函数把逻辑理清楚;
- 看完之后建议写篇文章来描述下,以后忘记了再稍微看看能搞清楚;
感兴趣的家庭作业
XDL代码里面有其他不同的allocator如buddy_allocator, slab_allocator, slab_buddy_allocator,如果有人感兴趣可以按照我前面提的方法来理解下这几块内容,大家一起学习、讨论。